OnDemand: Interactive Sessions
Interactive sessions allow you to start and manage selected apps. Depending
on the app they run as servers or GUIs. Selecting My Interactive Sessions
in the top menu will direct you to the overview of currently running sessions.
The left-hand panel provides a short cut to start a new session of one of the
provided apps.
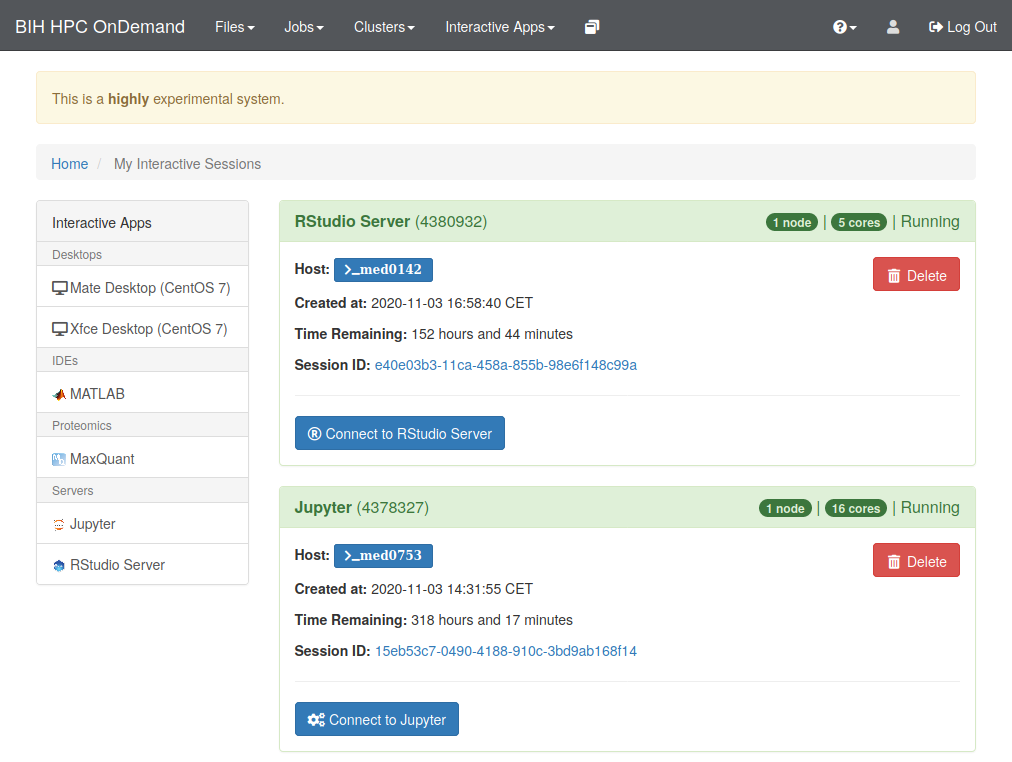
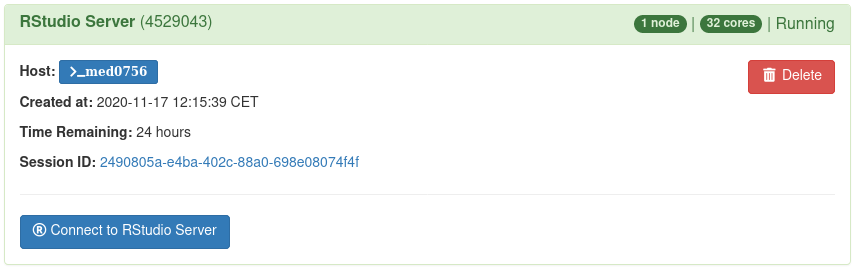
Each running interactive session is listed. Each card corresponds to one session. The title of each card provides the name, allocated resources and the current status. Furthermore, detailed information and links are available:
- Host: Provides the name of the node the session is running on. Click on the host name to open a shell to the given cluster node.
- Time remaining: Time until session till terminate.
- Session ID: Click to open the session directory in the interactive file browser (see below).
- Connect to: This will open the app in your browser (opens a new tab).
- Delete: Terminate the session.
Don't hit reload in your apps
Please note that the portal will use the authentication mechanisms of the apps to ensure that nobody except for you can connect to the session. This means that hitting the browsers "reload" button in your app will most likely not work.
Just go back to the interactive session list and click on the "connect" button.
Session Directories
The portal software will create a folder ondemand in your home directory.
Inside, it will create session directories for each started interactive job.
For technical reasons, these folders have very long names, for example:
$HOME/ondemand/data/sys/dashboard/batch_connect/sys/ood-bih-rstudio-server/output/e40e03b3-11ca-458a-855b-98e6f148c99a/
This follows the pattern:
$HOME/${application name}/output/${job UUID}
The job identifier used is not the Slurm job ID but an identifier internal to OnDemand. Inside this directory you will find log files and a number of scripts that are used to start your job.
If you need to debug any interactive job, start here. Also, the helpdesk will need the path to this folder to help you with interactive jobs.
You can find the name of the latest output folder with the following command:
$ ls -lhtr $HOME/${application name}/output | tail -n 1
For example, for RStudio Server:
$ ls -lhtr $HOME/ondemand/data/sys/dashboard/batch_connect/sys/ood-bih-rstudio-server/output | tail -n 1
Prevent Home From Filling Up
You should probably move ~/ondemand to your work volume with the following:
$ mv ~/ondemand ~/work/ondemand
$ ln -sr ~/work/ondemand ~/ondemand
Make sure to delete potential interactive sessions and to logout from the
Ondemand Portal first. Otherwise, the ~/ondemand folder is constantly
recreated and the symlink will be just created within this folder as
~/ondemand/ondemand and thus not be used as intended.
Also, clear out ~/work/ondemand/* from time to time but take care that you don't remove the directory of any running job.
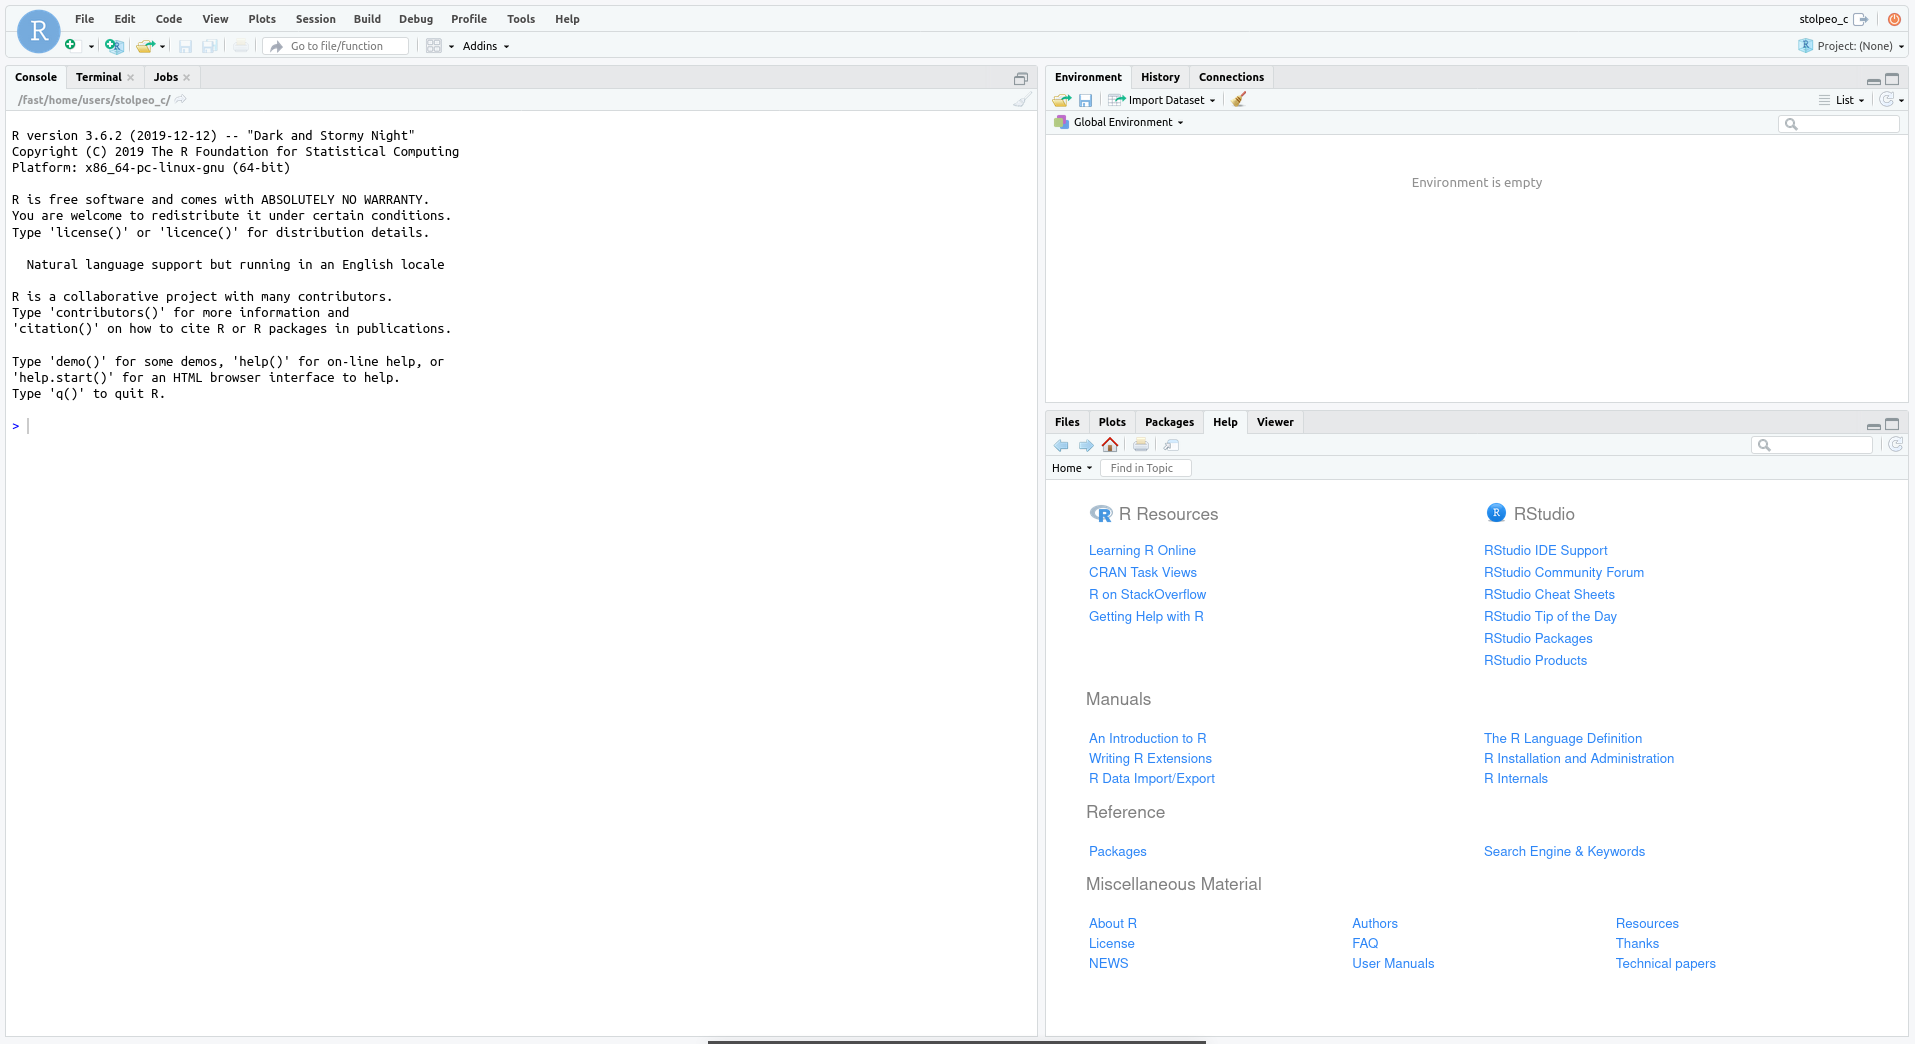
Example 1: Default RStudio Session
This description of starting an RStudio session is a showcase for starting other interactive apps as well.
To start the session, please go to Interactive Apps in the top menu bar and select RStudio Server or click RStudio Server in the left-hand panel.
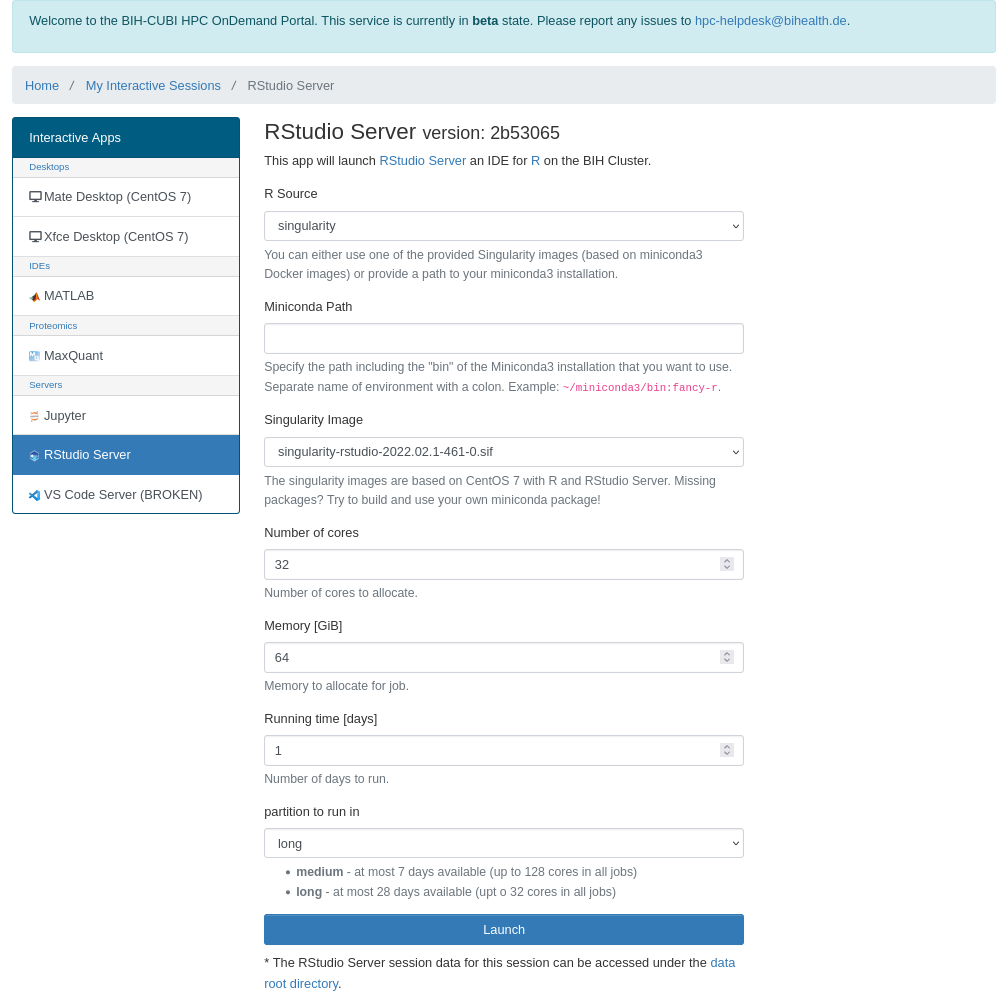
Allocate appropriate resources and click Launch.
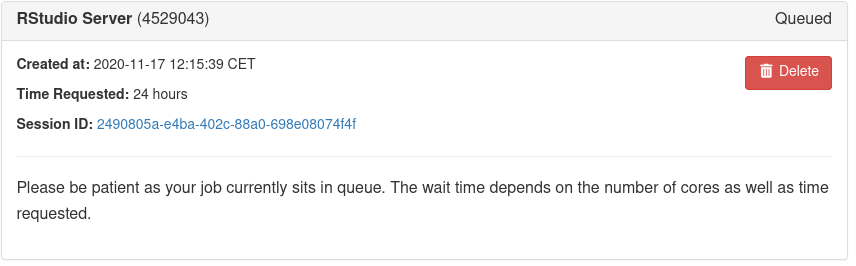
An info card for the RStudio Server will be added to My Interactive Sessions, and during start,
it will change its state from Queued to Starting to Running. Depending on the app, resources allocated and
current cluster usage, this will take a couple of seconds.
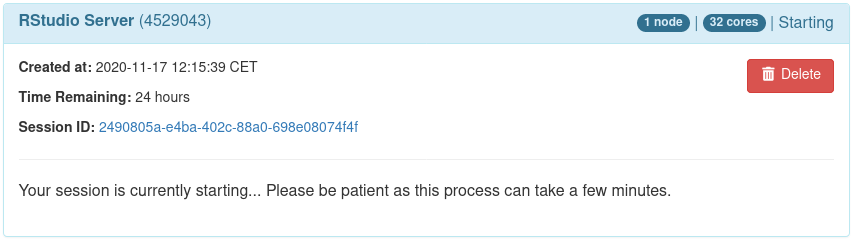
When in the final state (Running), one can directly connect to the RStudio Server
to get an interactive session by clicking Connect to RStudio Server:
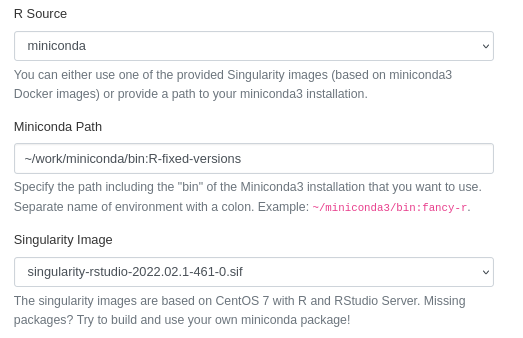
Example 2: RStudio Session with custom R-installation from conda
To use the OnDemand portal with a specific R installation including a stable set of custom packages you can use a conda enviroment from the cluster as a R source.
For this you may first need to create this conda environment including your R version of choice and all necessary packages. Specific installations of i.e. python from conda can be used similarly in other interactive apps.
- For reproducibility this environment should clearly define all package versions and include dependencies. This is easiest to achieve by first collecting all packages you need into a primary collection (i.e. a yaml file, potentially including a specific R version for r-base if needed) and creating an environment from there. Exporting this environment will generate a file with all used packages and their version numbers, that can be used to recreate the same environment.
- Example code:
Click to expand
* Commands: + `conda env create -n R-example -f R-example.yaml` + `conda activate R-example` + `conda env export -f R-fixed-versions.yaml` + `conda env create -n R-fixed-versions -f R-fixed-versions.yaml` * R-example.yamlchannels:
- conda-forge
- bioconda
- nodefaults
dependencies:
- r-base
- r-essentials
- r-devtools
- bioconductor-deseq2
- r-tidyverse
- r-rmarkdown
- r-knitr
- r-dt
- R packages only available from github
Some packages (i.e. several single-cell-RNAseq analysis tools) are only available from github and not on Cran/Bioconductor. There are two ways to install such packages into a conda enviroment.
Click to expand
1) Install from inside R \[easier option, but not pure conda\] * First setup the conda env, ideally including all dependencies for the desired package from github (and do include r-devtools) * Then within R run `devtools::install_github('owner/repo', dependencies=F, upgrade=F, lib='/path/to/conda/env-name/lib/R/library')` * if you don't have all dependencies already installed you will have to omit dependencies=F and risk a mix of conda & native R installed packages (or just have to redo the conda env). * github_install involves a build process and still needs a bit of memory, so this might crash on the default `srun --pty bash -i` shell 2) Build packages into a local conda channel \[takes longer, but pure conda\]\ This approach is mostly taken from the answers given [here](https://stackoverflow.com/questions/52061664/install-r-package-from-github-using-conda). These steps must be taken _before_ building the final env used with Rstudio * use `conda skeleton cran https://github.com/owner/repo [--git-tag vX.Y]` to generate build files * conda skeleton only works for repositories with a release/version tag. If the package you want to install does not have that, you either need to create a fork and add a such a tag, or find a fork that already did that. Downloading the code directly from github and building the package from that is also possible, but you will the need to manually set up the `meta.yaml` and `build.sh` files that conda skeleton would create. * If there is more than one release tag, do specify which one you want, it may not automatically take the most recent one. * If any r-packages from bioconductor are dependencies, conda will not find them during the build process. You will need to change the respective entries in the `meta.yaml` file created by conda skeleton. I.e. change `r-deseq2` to `bioconductor-deseq2` * Build the package with `conda build --R=Starting the Rstudio session via the OnDemand portal works almost as described above (see Example 1). However, you do have to select `miniforge` as R source and provide the path to your miniforge installation and (separated by a colon) the name of the (newly created) conda enviroment you want to use.
Additional notes:
- Updating the conda env, that an already running rstudio instance is using, does work but does requires a restart of the R session to take effect
- If you are starting a new interactive Rstudio session but with a different conda environment than before, Rstudio will still start from the same project as before. In this case the 'old' project likely still contains the previous
.libPaths()entries and therefore a link to your previous conda installation. Creating a new project cleans.libPaths()to only the env specified in setting up the Rstudio session.