Overview
BIH HPC 4 Research
BIH HPC 4 Research is located in the BIH data center in Buch and connected via the BIH research network. Connections can be made from Charite, MDC, and BIH networks. The cluster is open for users with either Charite or MDC accounts after getting access through the gatekeeper process. The system has been designed to be suitable for the processing of human genetics data from research contexts (and of course data without data privacy concerns such as public and mouse data).
Cluster Hardware and Scheduling
The cluster consists of the following major components:
- 2 login nodes for users
hpc-login-1andhpc-login-2(for interactive sessions only), - 2 nodes for file transfers
hpc-transfer-1andhpc-transfer-2, - a scheduling system using Slurm,
- 228 general purpose compute nodes
hpc-cpu-[1-228] - a few high memory nodes
hpc-mem-[1-5], - 7 nodes with 4× NVIDIA V100 GPUs each (
hpc-gpu-[1-7]), 1 node with 10× NVIDIA A40 GPUs (hpc-gpu-8), 3 nodes with 4× NVIDIA L40 GPUs each (hpc-gpu-[9-11]), - a next generation high-performance storage system based on Ceph/CephFS
- a tier 2 (slower) storage system based on Ceph/CephFS.
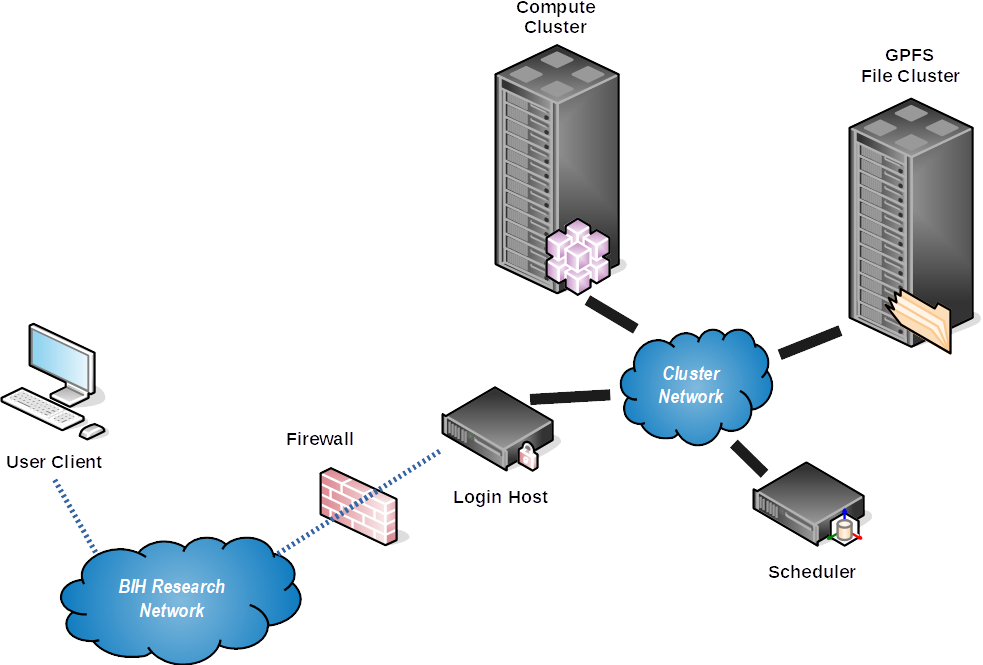
This is shown by the following picture:
Differences Between Workstations and Clusters
The differences include:
- The directly reachable login nodes are not meant for computation!
Use
srunto go to a compute node. - Every time you type
srunto go to a compute node you might end up on a different host. - Most directories on the nodes are not shared, including
/tmp. - The
/fastdirectory is shared throughout the cluster which contains your home, group home, and project directories. - You will not get
rootorsudopermissions on the cluster. - You should prefer batch jobs (
sbatch) over calling programs interactively.
What the Cluster Is and Is NOT
NB: the following might sound a bit harsh but is written with everyone's best intentions in mind (we actually like you, our user!) This addresses a lot of suboptimal (yet not dangerous, of course) points we observed in our users.
IT IS
- It is scientific infrastructure just like a lab workbench or miscroscope. It is there to be used for you and your science. We trust you to behave in a collaboratively. We will monitor usage, though, and call out offenders.
- With its ~200 nodes, ~6400 threads and fast parallel I/O, it is a powerful resource for life science high performance computation, originally optimized at bioinformatics sequence processing.
- A place for data move data at the beginning of your project. By definition, every project has an end. Your project data needs to leave the cluster at the end of the project.
- A collaborative resource with central administration managed by BIH HPC IT and supported via hpc-helpdesk@bih-charite.de
IT IS NOT
- A self-administrated workstation or servers.
- You will not get
sudo. - We will not install software beyond those in broad use and available in CentOS Core or EPEL repositories.
- You can install software in your user/group/project directories, for example using Conda.
- You will not get
- A place to store primary copies of your data. You only get 1 GB of storage in your home for scripts, configuration, and documents.
- A safe place to store data. Only your 1 GB of home is in snapshots and backup. While data is stored on redundant disks, technical or administrative failure might eventually lead to data loss. We do everything humanly possible to prevent this. Despite this, it is your responsibility to keep important files in the snapshot/backup protected home, ideally even in copy (e.g., a git repository) elsewhere. Also, keeping safe copies of primary data files, your published results, and the steps in between reproducible is your responsibility.
- A place to store data indefinitely. The fast CephFS Tier 1 storage is expensive and "rare". CephFS Tier 2 is bigger in volume, but still not unlimited. The general workflow is: (1) copy data to cluster, (2) process it, creating intermediate and final results, (3) copy data elsewhere and remove it from the cluster
- Generally suitable for primary software development. The I/O system might get overloaded and saving scripts might take some time. We know of people who do this and it works for them. Your mileage might vary.